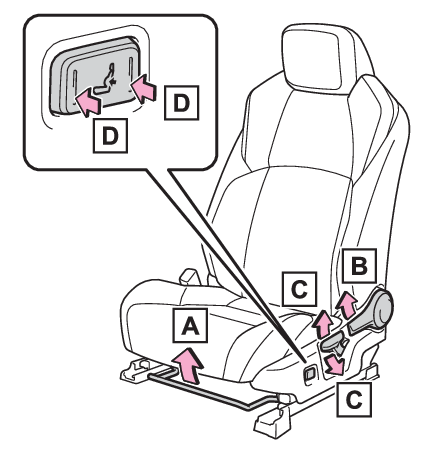
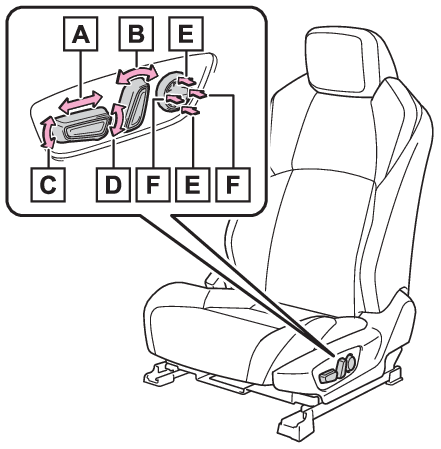
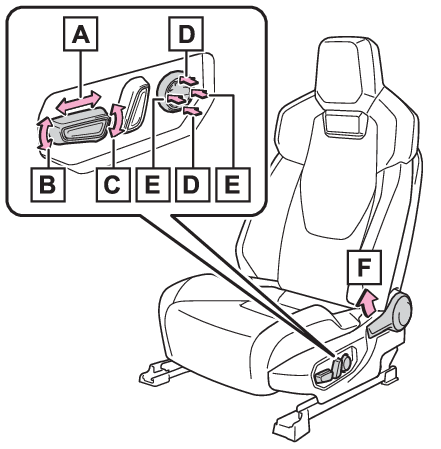
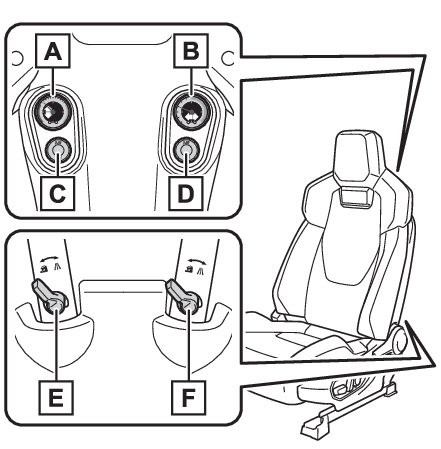
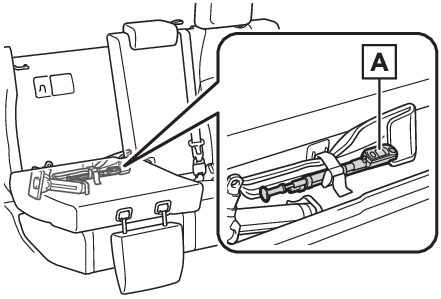
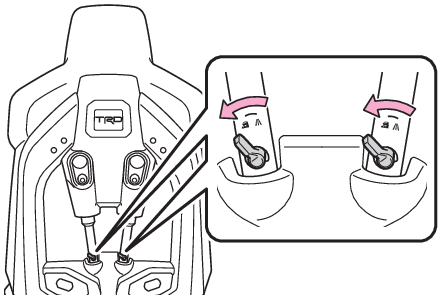
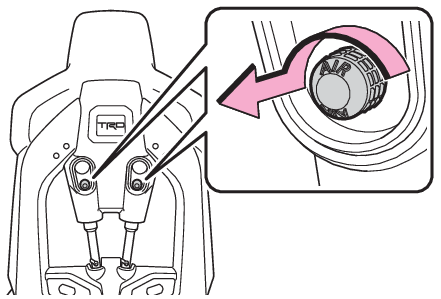
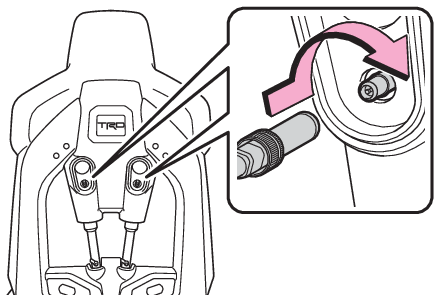
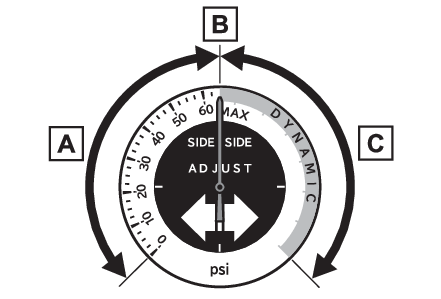
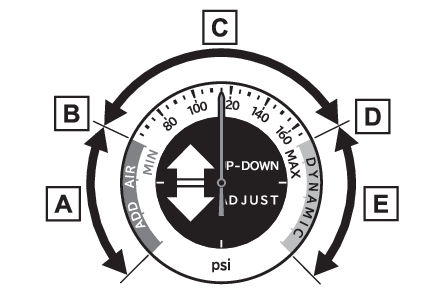
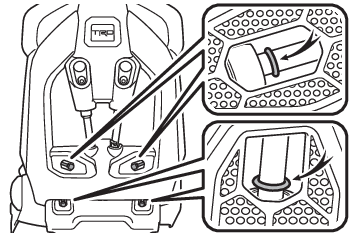
Front seats The seats can be adjusted (longitudinally, vertically, etc.). Adjust the seat to ensure the correct driving posture. IsoDynamic Performance seat (If equipped): Includes 4-way shock absorption. (IsoDynamic Performance seat (If equipped)) Seats Adjustment Front seats Adjustment Adjustment procedure Manual seat (if equipped) Seat position adjustment lever Seatback angle adjustment lever Vertical height adjustment lever Seat lumbar support adjustment switch (driver’s seat only) Power seat type A (if equipped) Seat position adjustment switch Seatback angle adjustment switch Seat cushion (front) angle adjustment switch Vertical height adjustment switch Lumbar support height adjustment switch (if equipped) Lumbar support adjustment switch Power seat type B (if equipped) Seat position adjustment switch Seat cushion (front) angle adjustment switch Vertical height adjustment switch Lumbar support height adjustment switch Lumbar support adjustment switch Seatback angle adjustment lever Note: When adjusting the seat Make sure that any surrounding passengers or objects are not contact the seat. Take care when adjusting the seat so that the head restraint does not touch the ceiling. Warning: Seats Adjustment precautions When adjusting the seat position Take care when adjusting the seat position to ensure that other passengers are not injured by the moving seat. Do not put your hands under the seat or near the moving parts to avoid injury.Fingers or hands may become jammed in the seat mechanism. Make sure to leave enough space around the feet so they do not get stuck. Seat adjustment To reduce the risk of sliding under the lap belt during a collision, do not recline the seat more than necessary.If the seat is too reclined, the lap belt may slide past the hips and apply restraint forces directly to the abdomen, or your neck may contact the shoulder belt, increasing the risk of death or serious injury in the event of an accident.Adjustments should not be made while driving as the seat may unexpectedly move and cause the driver to lose control of the vehicle. Manual seat only: After adjusting the seat, make sure that the seat is locked in position. Seats IsoDynamic Performance seat Front seats IsoDynamic Performance seat IsoDynamic Performance seat (If equipped) Vertical shock absorber air pressure gauge Horizontal shock absorber air pressure gauge Vertical adjust air valve Horizontal adjust air valve Vertical shock absorber lock lever Horizontal shock absorber lock lever Using the Vertical and Horizontal shock absorber Take out the air pump. Air pump Turn the lever on the IsoDynamic Performance seat to the unlock . Remove the valve cap by turning it counterclockwise. Attach the air pump nozzle clockwise to the horizontal adjust air valve or vertical adjust air valve. Adjust the air pressure inside the shock absorber using the air pump, referring to the table below. Horizontal shock absorber air pressure air gauge Customer should keep pressure in this area “ MAX” “ DYNAMIC” area Vertical shock absorber air pressure air gauge “ ADD AIR” area “ MIN” Customer should keep pressure in this area “ MAX” “ DYNAMIC” area If pressure drops into the “ ADD AIR” area add air until is out of this area. Pressure may drop into “ ADD AIR” area due to temperature or occupant mass fluctuation. If this happens air should be added to the system. If the pressure continually drops into “ ADD AIR” area for no reason customer should bring the vehicle to the dealer for inspection. If systems are filled to or near the “ MAX” the needle may move into the “ DYNAMIC” area while driving over rough terrain. This will cause no damage to the shock systems but pressurizing the systems into the “ DYNAMIC” area will lead to the shocks being too stiff to see any benefit from the systems. The systems are also equipped with a max pressure relief valve to ensure no damage is done due to over pressurizing. Horizontal shock absorber air pressure
Occupant Weight lb. (kg) Low-Speed Off-Road psi (kPa, kgf/cm2 or bar) Hi-Speed Off-Road psi (kPa, kgf/cm2 or bar)
Below 140 (Below 63.5) 15 (103, 1.03) 20 (138, 1.38)
140 to 170 (63.5 to 77.1) 18 (124, 1.24) 25 (172, 1.72)
170 to 200 (77.1 to 90.1) 20 (138, 1.38) 30 (207, 2.07)
200 to 230 (90.1 to 104) 20 (138, 1.38) 40 (276, 2.76)
230 to 250 (104 to 113) 20 (138, 1.38) 40 (276, 2.76)
250 to 270 (113 to 144) 20 (138, 1.38) 45 (310, 3.10)
270 or more (144 or more) 20 (138, 1.38) 50 (345, 3.45)
Vertical shock absorber air pressure
Occupant Weight lb. (kg) Low-Speed Off-Road psi (kPa, kgf/cm2 or bar) Hi-Speed Off-Road psi (kPa, kgf/cm2 or bar)
Below 140 (Below 63.5) 60 (414, 4.14) 70 (483, 4.83)
140 to 170 (63.5 to 77.1) 60 (414, 4.14) 75 (517, 5.17)
170 to 200 (77.1 to 90.1) 65 (448, 4.48) 80 (551, 5.51)
200 to 230 (90.1 to 104) 70 (483, 4.83) 85 (586, 5.86)
230 to 250 (104 to 113) 75 (517, 5.17) 90 (621, 6.21)
250 to 270 (113 to 144) 75 (517, 5.17) 105 (724, 7.24)
270 or more (144 or more) 80 (551, 5.51) 120 (827, 8.27)
Remove the air pump. Install the valve caps. After using, turn the shock absorber lock lever to the lock side .
Note: Seats are equipped with shock stroke indicators. These can be used to see how much stroke the shocks are seeing to help decide the necessary pressure for the vertical or horizontal shock systems based on occupant size and terrain.